Wednesday, December 11, 2013

For Sale!

 Clip assortment- $4 shipped


Star silver sequins (55-60 in a pack)- $2 shipped

 Washi- all 13 for $15 shipped, 1 for $3 shipped
 Paper Girl by the girls' paperie- $9 shipped
 Handwriting by heidi swapp- $9 shipped
 Cheerful Bee- $8 shipped
 Tags and Words- $8 shipped
 We are family- $8 shipped
 Pretty Poppies- $5 shipped
 Penguin stamps (2)- $5 shipped
 Halloween stamps (2) - $5 shipped

 Flower McGill punch- $6 shipped
 Candy cane stamp- $2 shipped
 Imaginisce stamps (9)- $6 shipped
 Studio G stamps (7)- $5 shipped
 Studio G stamps (11)- $ 6 shipped
 Background stamps (prima and ditto) - $5 shipped
Ditto stamps - $4 shipped

Friday, June 8, 2012

Pocket Mini Album Pages

Hey guys! :) This is a pocket mini album tutorial that i came up with that involves a base page with add-ons. The final page size is 6 inches wide with 1/2 inch binding strip by 5 1/2 inches tall. I designed this mini album so that there is very little scrap left over. So here we go!

These are the two templates for how to cut your 12 x 12 sheets. You will need a total of three sheets of 12 x 12 to make a four page book. Two sheets for the base template and one sheet for the add-on template

          Base Template                                                                Add-on Template


          The Base Template                                                  


This is what the base looks like all cut apart.
First cut down the middle at 6 inches. On both
6 x 12 pieces, score at 1/2 inch on the top and
1/2 on one long side. Cut off the 1/2 inch
piece that on the bottom. You will need to
cut two pages worth of bases, or 4 total
pocket  pages.


After you fold on your score lines and
glue on the tabs that were indicated,
this is what the pocket page looks like.


Now to make the add-ons.
This is what the Add-on Template
looks like. First cut off piece 1
at 3 5/8.
This is what piece 1 looks like. It is 3 5/8 by 12. cut off 1/2
inch at the top. then score at 1/2 inch on the right side and then
 at 5/8. Then turn it to the right. score it at 1/2 inch and at 6.
Make sure you keep both 1/2 inch tabs, you need them both.

This is the finished pocket add-on.   Use the long 1/2 inch tab closest to the bottom
1/2 inch tab to close the pocket and use the other 1/2 inch long tab to attach the
pocket to the right side of the pocket page base.


This is what you should have left
after you cut off piece 1. Make sure
at this point you score along the top
and along the right side at 1/2 inch.
From the bottom of the paper, cut at 5 1/2 inches to get
piece 4, which is 5 1/2.  The remaining piece (2&3) should
be 6 1/2 inches tall.

Sorry for this being upside down. You will
take piece 4 and score it at 3 1/2 and at 8.

Fold the short piece under the longer piece
then glue the tab to the right side of a base
pocket page.

With the remaining piece, cut off
2 1/2 inches to get piece 3. From the
remaining piece 2, cut off 1/2 inch
from the bottom. Then turn the piece
and cut it at 5 1/2.

The long side should already be scored but you need to score at 1/2 inch on both the top and bottom.


The final measurements of this piece should
be 5 1/2 by 6. Fold the tap over at the top
and attach the tab to the top of the pocket
base page, make sure you attach the tab
to the front of the pocket page base.

I hope you like this idea and if you have any  questions don't be afraid to ask.


Sunday, November 27, 2011

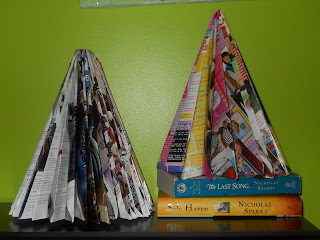
cute recycled christmas trees

Hi! so i was looking on the internet for cute things for christmas and  i found a tutorial to make these cute trees out of old magazines. the link to the tutorial is  http://greeneyed.com/2010/12/diy-magazine-christmas-tree/. try it out! :)


                ~paige

Hey guys! This is just a project i was working on over the summer. It is my version of a smash book. I used the 6 x 6 cosmo cricket social club paper pad to decorate the inside pages. I used 8 1/2 x 11 kraft paper for the inside pages.
This is the front cover of my book. I used a piece of chipboard for the front and back covers and covered them with 12 x 12 pieces of paper from the social club line from cosmo cricket. I used elements from the collection and some stuff from my stash to decorate the cover.

Below are some pictures of some of the inside pages. They have a bunch of stuff on them and i had so much fun making them. I used buttons, punched items, printed items, ticket and receipts, gems, hand written titles, stamped elements, and so much more.


I hope you guys like it:) 
                               
                      ~ paige